
Table of Contents
ToggleAn L-shaped standing desk is one of the smartest investments a home office can get. It combines ample workspace with ergonomic flexibility, letting you shift between sitting and standing throughout the day. If you’re building a productive workspace at home, whether you’re a freelancer, remote worker, or just need better desk real estate, an L-shaped standing desk delivers surface area without eating your entire room. This guide covers what makes these desks work, what features matter most, and how to set one up right the first time.
Key Takeaways
- An L-shaped standing desk provides nearly double the usable workspace of a standard desk while maintaining efficient corner placement and hiding cable management out of sight.
- Dual-motor electric standing desks with a 24–26″ height range and anti-collision detection ensure smooth sitting-to-standing transitions that encourage movement throughout the day.
- Proper ergonomic setup—with elbows at 90°, screens at arm’s length, and keyboard at elbow height—transforms an L-shaped standing desk into a productivity tool that reduces fatigue and supports long-term health.
- Quality tabletop materials like solid wood, laminate, or 3/4″ plywood with steel frames prevent sagging and wobbling under monitor and equipment weight.
- L-shaped standing desk assembly requires level alignment, secure motor wiring, and a full-range motion test before loading to ensure stability and safe operation.
- Multi-monitor and dual-task setups on the L-configuration allow you to dedicate one section to reference material while the other handles primary work without losing workspace or workflow efficiency.
Why L-Shaped Standing Desks Are Ideal for Modern Workspaces
An L-shaped standing desk gives you two work surfaces at a right angle, creating a cockpit-like setup that’s practical for multi-monitor setups, dual tasks, or just spreading out without clutter. Unlike a linear desk, the L-configuration tucks into corners or floats in the middle of a room, adapting to whatever your space allows.
The standing feature is the real game-changer. Sitting all day locks your hips, rounds your back, and tanked leg circulation, standing desks break that cycle. Studies consistently show that alternating between sitting and standing throughout the day reduces fatigue, improves focus, and can ease back pain for some users. The key is that you’re choosing movement, not forced into it.
For DIY enthusiasts and home office dwellers, the L-shape solves a real problem: cramped single-desk setups force you to choose between monitor space, keyboard room, and a spot for your coffee. An L-shaped standing desk lets you have all three, plus breathing room for paperwork, a printer, or a secondary project.
Space Efficiency and Layout Optimization
The L-shape’s corner footprint is actually efficient. A 48″ × 24″ horizontal section paired with a 24″ × 24″ vertical wing gives you roughly 72 square feet of usable surface, nearly double what a standard 48″ desk provides, but the corner placement doesn’t dominate a room the way a sprawling linear desk would.
Corner placement also means fewer cable runs across open floor space: everything feeds neatly into the corner, where power strips and cable management stays out of sight. If you’re using a motorized standing desk model, the motor assembly hides on the underside, keeping sight lines clean.
Layout flexibility matters too. Some people put monitors on the longer section and keep the return (the shorter L-portion) for writing, sketching, or hardware like printers. Others reverse it, return becomes the monitor zone, main section handles papers and projects. The beauty is you can adjust the config without buying new furniture.
Key Features to Look for When Choosing an L-Shaped Standing Desk
When you’re shopping for or building an L-shaped standing desk, a few specs separate the keepers from the regretful purchases. Motor quality, height range, material durability, and surface finish all matter, and they’re worth understanding before you commit.
Motor Quality and Height Adjustment Range
If you’re buying an electric standing desk (rather than building one), the motor is non-negotiable. A quality dual-motor system, one motor per leg or leg pair, adjusts smoothly and handles full-width loading without wobble. Cheap single-motor setups can’t keep both corners level when you load one side heavier than the other: they tilt or bind.
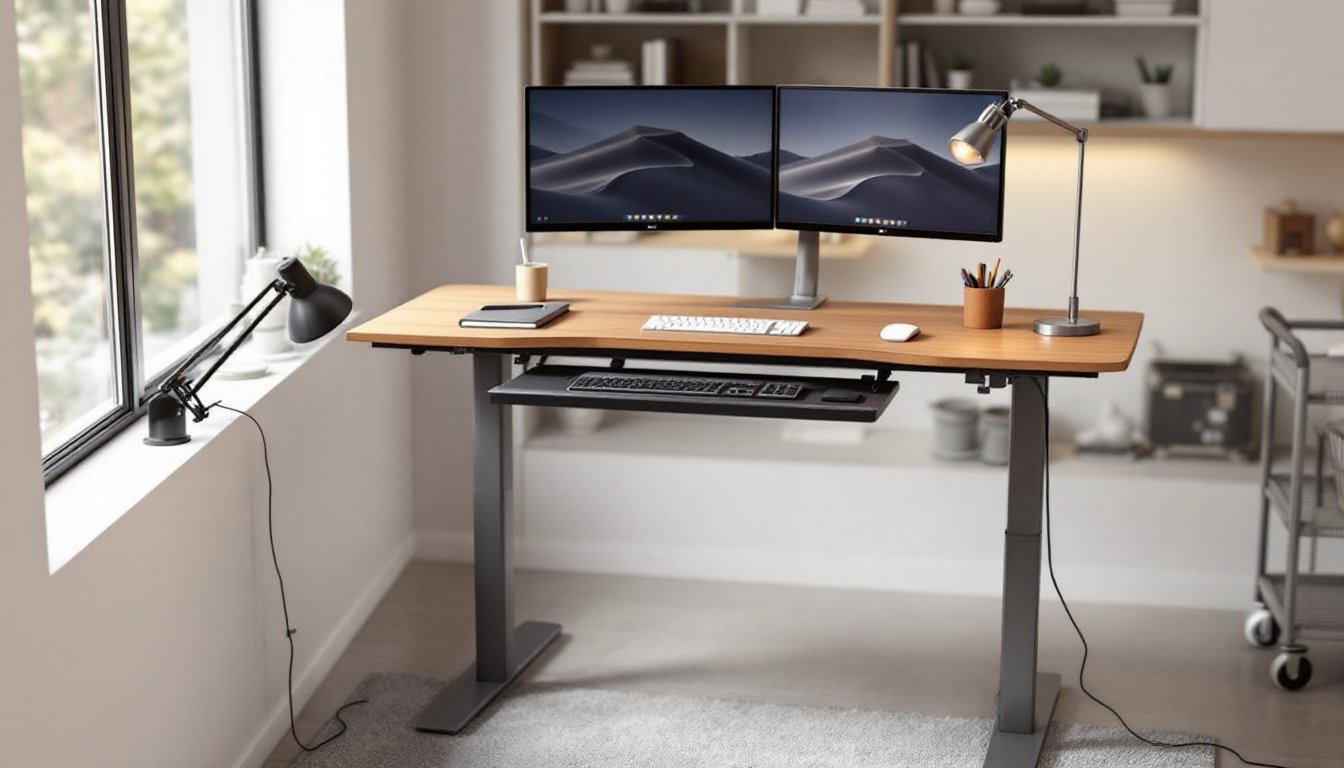
Height range matters equally. Standard desks sit 28″–30″ tall (sitting height). A good standing desk adjusts from 22″ (for shorter users or seated kids’ workstations) up to 48″ or beyond. Check the spec sheet, some budget units only move 6″–8″, which barely lets you shift your weight. You want at least a 24″–26″ range for real sitting-to-standing comfort.
Speed of adjustment is underrated. A fast motor (2″–3″ per second) means you’ll actually switch positions throughout the day. Crawling motors make standing feel like punishment. Noise matters too: a quiet motor won’t disrupt calls or focus sessions.
Security and stability are critical. Look for desks with a memory controller that remembers your favorite heights, saves you from re-measuring every time you stand. Anti-collision detection (the desk stops if it hits an obstacle while adjusting) prevents pinched cables or crushed fingers.
Material Durability and Surface Quality
Tabletop material sets the tone for longevity and feel. Solid wood (oak, walnut, maple) lasts forever and ages beautifully but costs more and needs occasional refinishing. Engineered wood or veneer over plywood is budget-friendly and durable if the finish is good: cheap veneer chips and peels within a year.
Laminate surfaces (like Formica) are scratch-resistant and easy to wipe clean, solid choice for heavy-use desks. Avoid hollow-core or thin particleboard: they sag under monitor weight and dent from drops.
Base construction matters as much as the top. Steel or aluminum frames with cross-bracing stay rigid: flimsy frames wobble when you type or bump the desk. Check weight capacity specs, most should handle 150–300 lbs of combined load. If you’re stacking monitors, speakers, printers, and hardware, that adds up fast.
Edge finish prevents splinters and looks pro. A banded or bullnose edge (rounded and sealed) outlasts a sharp edge that can chip. Inspect corners and seams for gaps that’ll trap dust and collect grime. If you’re buying pre-made, watch reviews for quality complaints about wobbly frames or finish defects.
For DIY builders, plywood with a solid-wood edge banding and a polyurethane finish delivers strength and looks without premium pricing. Recent woodworking projects using modern L-shape configurations show that 3/4″ plywood tops paired with steel pipe or 2×4 frames handle years of daily work.
Setting Up Your L-Shaped Standing Desk for Maximum Comfort
Getting the ergonomics right turns an L-shaped standing desk from furniture into a tool that actually supports your work and your body. Poor setup sabotages everything, wrong height, bad monitor angle, or clutter on the surface will send you back to sitting all day.
Start with height. When you’re standing, your elbows should bend at roughly 90° with your shoulders relaxed. Type a few sentences at your target standing height and notice where your elbows fall, they should be neither reaching up nor cramping down. Sitting height follows the same rule: level forearms, neutral wrists. If you’re alternating, aim for a desk that adjusts smoothly between these two zones without forcing you to readjust monitors or keyboard position.
Monitor placement is next. Your screen should sit roughly arm’s length away (20″–30″ depending on screen size) and positioned so the top of the screen is at or just below eye level when you’re looking straight ahead. A single large monitor (32″–34″) works well on the long section: dual 24″ or 27″ monitors work better if you separate them with a monitor arm. Multi-monitor setups on an L-desk let you dedicate one section to reference material while the other handles primary work.
Keyboard and mouse positioning prevents wrist strain. Keep your keyboard and mouse at the same height as your elbows when arms hang naturally. Avoid placing them lower (wrist bend) or higher (shoulder shrug). A keyboard tray or monitor arm with a keyboard shelf helps fine-tune this without moving the entire desk surface. Some people also pair an L-desk with a standing anti-fatigue mat, 3/4″ thick, cushioned varieties reduce foot and leg fatigue during longer stands.
Cable management stops clutter from eating workspace. Run cables under the desk or through cable trays mounted to the underside. Label cables at both ends (printer, monitor left, monitor right) so future adjustments don’t become a tangled mess. When you’re raising and lowering an electric desk, excess slack in cables can catch and pinch, so bundle and secure them loosely.
Personalize the surface. One side of your L-desk might host a small desk lamp and your primary work zone: the return could hold reference books, a printer tray, or a second monitor. Keep everyday items within arm’s reach but away from your typing zone. Pen cup, notepad, and charging dock on one corner keep things accessible without clutter spreading across your working surface.
DIY Installation Tips and Best Practices
If you’re building your own L-shaped standing desk or assembling a flat-pack unit, a few practices separate clean, sturdy builds from wobbly disappointments.
Before assembly, lay out all parts and hardware on a clean floor. Check that you have matching legs, correct bolts, and all pieces before starting, missing parts mid-build are infuriating. Read the instructions fully first: don’t assume you know the sequence.
Level and alignment are critical. Use a 4-foot level (a 2-foot is too short for an L-configuration) to check both the horizontal plane and the vertical legs as you assemble. Uneven legs create wobble and put stress on the motor if it’s electric. If your floor is uneven, shim the legs with plastic shims or hardwood spacers until the entire desk sits flush.
For motorized desks, the control box and motor wiring need secure mounting before you move the desk around. Don’t route power cords under the frame where standing-desk legs could pinch them when adjusting height. Secure wires with cable clips rated for the environment, cheap plastic clips break, and loose cables become safety hazards.
When tightening bolts and fasteners, use the correct socket or wrench size to avoid stripping. Tighten in a star pattern (opposite corners alternately) rather than in sequence, this ensures even pressure and prevents warping. Don’t over-tighten wood screws into plywood: they’ll split the material. Snug is usually enough.
Test the full range of motion before loading it up. Raise and lower the desk several times and listen for grinding, catching, or stuttering. If the motor hesitates at certain heights, check that cables aren’t pinched or twisted. Once everything cycles smoothly, load your monitors, keyboard, and other gear.
For a stable build, woodworking tutorials and assembly guides walk you through frame assembly, top attachment, and finish details. If you’re new to this, ask a friend to help, holding one corner level while you tighten the other is much easier with two people.
Safety matters. Wear safety glasses when drilling or cutting, use a dust mask if you’re sanding plywood, and keep your hands clear of pinch points when raising or lowering the desk. If you’re working with power tools, unplug them when changing bits or blades. Electric standing desks have moving parts, keep loose clothing, hair, and fingers clear of the mechanism.
Paint or stain comes last. A beginner-friendly approach to woodworking projects often recommends a polyurethane or poly-oil finish for tabletops, protective, easy to apply, and repairable if dinged later. Sand with 120-grit, then 180-grit before finishing for the smoothest surface. Allow full cure time (often 24–48 hours depending on the product) before full loading.